Acrylic fabric bonding is an industrial process that joins acrylic canvas, awning, and marine fabrics using heat-activated adhesive tape or specialized acrylic cement — creating seams that are stronger, more durable, and leak-resistant compared to traditional sewing.
Miller Weldmaster covers every stage of the bonding process: how acrylic fabric behaves under heat, which welding method suits your production volume, how bonded seams compare to sewn alternatives, and how to prevent the most common bonding failures. Whether you run a small awning shop or a high-volume production line, the information here maps directly to your buying decision.
Key Takeaways
- Acrylic fabric cannot be thermoplastic-welded like PVC because it does not melt and re-fuse — bonding with heat-activated adhesive tape or acrylic cement is required instead.
- Hot air, hot wedge, impulse, and radio frequency welding methods can all activate acrylic bonding tape to create strong, durable seams.
- Bonded acrylic seams eliminate thread fade, needle hole leaks, and short thread life — the three most common failure points when sewing acrylic canvas.
- Process control — temperature, pressure, and machine speed — is the primary driver of seam strength and consistency in production environments.
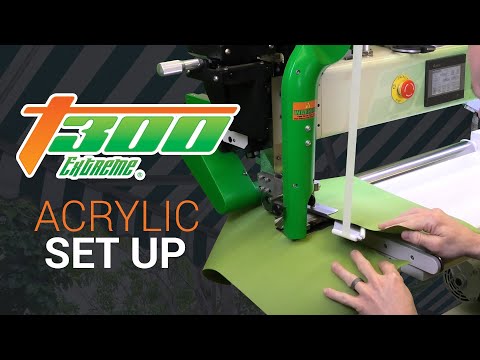
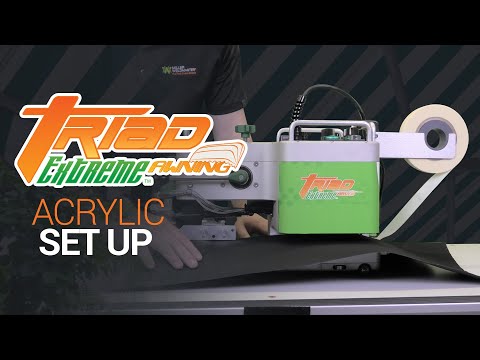
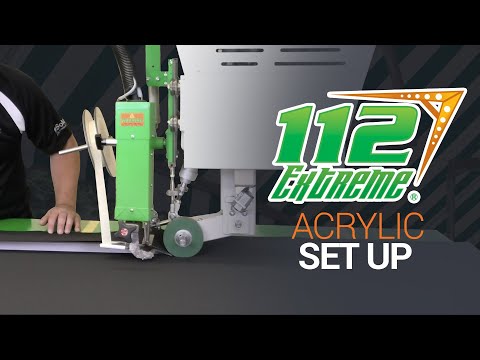
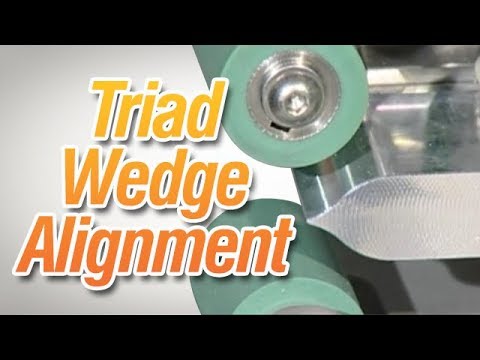
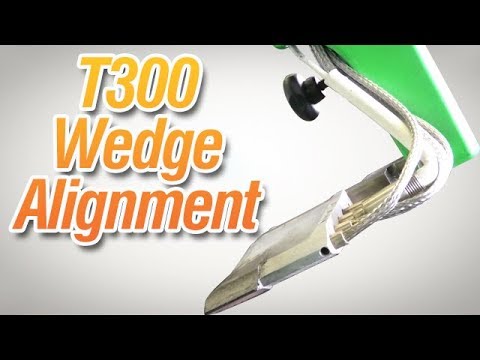
- Miller Weldmaster builds machines specifically calibrated for acrylic bonding, including the T300 Extreme, Triad Extreme, and 112 Extreme.
What Is Acrylic Fabric Welding?
Acrylic fabric welding — more precisely called acrylic fabric bonding — is the industrial process of permanently joining two or more pieces of acrylic fabric using a heat-activated adhesive tape or acrylic cement, applied through a controlled welding machine. The result is a seam that is fully sealed, weather-resistant, and structurally superior to traditional sewn seams for most outdoor and marine applications. Engineers often choose to do a solvent wipe, using isopropanol or a suitable cleaner, before bonding to ensure the surfaces are free from contaminants.
Unlike PVC or polyurethane fabrics that melt and re-fuse under direct heat, acrylic fabric is a synthetic and non-porous material at a fiber level, making standard water-based craft glues ineffective. Instead, specialized acrylic adhesives or cement are required as the bonding agent — not raw heat — to create a permanent seam. Understanding this distinction is the starting point for anyone selecting a machine or setting process parameters for acrylic production.
Acrylic cement, for example, works by chemically melting the surfaces of acrylic sheets, allowing them to fuse together as the solvent evaporates. This process creates a bond that is often stronger than the acrylic itself and preserves optical clarity, which is crucial when bonding clear acrylic sheets. The ability of acrylic adhesives to create strong bonds and maintain optical clarity makes them ideal for applications where aesthetics and durability are important. Selecting the right glue or adhesive is essential for ensuring the finished product meets both structural and visual requirements.
Why Acrylic Fabric Cannot Be Welded Like PVC
The core technical distinction: acrylic is a woven synthetic fiber, not a thermoplastic film. PVC and polyurethane fabrics melt under heat and re-fuse when pressure is applied — that is what direct thermoplastic welding exploits. Acrylic fabric does not behave this way. Apply direct heat without an adhesive and you risk glazing or scorching the surface without creating any seam bond. This is the most common misunderstanding buyers bring to the conversation, and it matters because it affects machine selection, tape selection, and every process parameter setting in production.
How Acrylic Adhesives Work in Acrylic Fabric Bonding
The thermal bonding process uses a laminated adhesive tape — strong adhesive on both sides — placed between the two pieces of acrylic fabric. The welding machine applies heat to activate the adhesive, and pressure from bonding rollers and bars sets the bond. Follow this sequence on every production run:
- Position laminated bonding tape between the two acrylic fabric pieces, fully seated within the seam allowance. Before proceeding, apply a test dot of adhesive on a scrap of fabric to ensure compatibility and prevent damage. Testing a small, hidden scrap of fabric first ensures that glue doesn't bleed through or damage the material.
- Apply controlled heat via the welding method — hot air, hot wedge, impulse, or RF — to activate the adhesive at the correct temperature range for acrylic.
- Apply pressure through bonding rollers and bars to consolidate the seam and ensure full contact between the tape adhesive and both fabric surfaces. When applying adhesive, control the flow carefully, ideally using a needle applicator or syringe, to prevent staining or excess adhesive. Using too much glue can cause it to saturate and discolor the fabric, so over-gluing should be avoided.
- Allow cooling before handling to achieve full bond strength. Pulling a seam before it has cooled is one of
What Properties Make Acrylic Fabric Worth Bonding?
Acrylic commands a premium in the awning, marine, and outdoor fabrication markets for specific performance reasons. Those same properties that make it valuable also make proper bonding critical — a failing seam on an acrylic product reflects on the fabric's performance, not just the manufacturing process.
- UV resistance: resists fading and surface degradation from extended sun exposure — the primary reason awning and marine fabricators specify it.
- Moisture wicking: draws moisture away from the surface without absorbing it, maintaining structural integrity in wet environments.
- Oil and chemical resistance: performs reliably in industrial and marine environments where contaminants are present.
- High tenacity and tensile strength: holds tension in awning frames and shade structures without elongating or sagging.
- Outdoor weathering performance: maintains structural integrity across temperature extremes, from cold winter storage to direct summer sun load.
Acrylic Fabric Bonding Methods: Comparing Hot Air, Hot Wedge, Impulse, and RF Welding
Choosing the right bonding method for acrylic fabric comes down to three variables: your production volume, your typical seam geometry, and the weight of the acrylic material you run. There are several types of acrylic adhesives, each with distinct features and uses to cater to different bonding needs and similar applications. Selecting the right adhesive is important for achieving optimal results in similar applications, as different adhesives like contact cement, spray glue, and industrial adhesives may be better suited for specific tasks. Each method activates the same heat-activated adhesive tape — what differs is how the heat is delivered and how fast the machine can move through a seam. The table below maps each method to the production context it serves best.
| Method | How It Works | Best For | Speed | Key Consideration |
| Hot Air Welding | Controlled hot air stream activates adhesive tape | Straight seams, medium-to-high volume awning production | Moderate to fast | Temperature control critical — too high causes surface glazing on acrylic |
| Hot Wedge Welding | Heated metal wedge contacts fabric layers directly to activate tape bond | Long, continuous seams on heavier acrylic canvas | Fast for continuous runs | Requires precise wedge alignment; slower setup for short runs |
| Impulse Welding | Brief, controlled heat pulse through sealing element activates tape bond | Shorter seam lengths, lower-volume shops, varied seam geometries | Slower per cycle, flexible | Consistent dwell time is key to repeatable seam strength |
| RF (Radio Frequency) Welding | Electromagnetic energy activates adhesive; contact-free heating through material | High-volume production, thick acrylic stacks | High throughput | Material must be compatible with RF activation; specialized tooling required |
The most important thing to understand about the table above: none of these methods involve melting the acrylic fabric itself. Every row describes a mechanism for activating the adhesive tape. The fabric stays intact. The bond forms between the tape and the fabric surface, not between two fabric surfaces fused together.
Machine Settings for Acrylic Bonding — Temperature, Pressure, and Speed
Acrylic fabric requires a lower heat band than vinyl or PVC. The exact range depends on the specific acrylic blend and coating weight, but the guiding principle holds across materials: if you can see surface glazing on the fabric face, the temperature is too high. Reduce heat before increasing speed to compensate.
Speed matters because dwell time — how long the fabric is exposed to heat at the bonding point — directly controls how much energy the adhesive absorbs. Running too fast at the right temperature produces an under-activated adhesive. Running too slow at the right temperature risks scorching. The correct balance is a test seam, not a calculation.
Pressure settings affect how well the activated adhesive contacts both fabric surfaces. Too little pressure and you get incomplete consolidation, especially at seam edges. Too much pressure on lightweight acrylic canvas can distort the fabric weave and create cosmetic issues on finished products.
Before any production run on a new fabric lot — or after any machine setting change — run a test seam on a scrap piece of the same material and conduct a peel test before committing. Miller Weldmaster's application specialists can advise on starting parameters for your specific fabric and machine model.
Acrylic Fabric Bonding vs. Sewing — Why Industrial Manufacturers Are Making the Switch
Sewing has been the standard joining method for acrylic canvas for decades. It works — up to a point. At production scale, and across the service life of outdoor and marine products, three specific failure modes consistently push fabricators toward bonded seams. Bonded seams achieve a strong bond and excellent adhesion, which are critical for long-term performance. Understanding each one helps explain why the switch from sewing to bonding is not just a process upgrade but a warranty and quality management decision.
| Sewn Acrylic Seams | Bonded Acrylic Seams | |
| Seam watertightness | Compromised by needle holes; degrades over time with UV exposure | Fully sealed seam — no needle holes, watertight throughout service life; strong bond and excellent adhesion |
| Thread fade over time | Thread loses color and strength before fabric fails | No thread — seam appearance matches fabric lifespan |
| Needle hole leaks | Every stitch is a perforation; worsens as thread weakens | Eliminated — adhesive tape fills and seals the seam line, providing durable adhesion |
| Production speed | Labor-intensive; dependent on operator skill and machine threading | Consistent throughput; machine settings drive repeatable output |
| Seam rework rate | Re-sewing is time-consuming and may require fabric replacement | Rework is minimal when process parameters are set correctly |
| Labor cost per linear foot | Higher — thread cost, needle changes, operator downtime | Lower at production scale once settings are validated |
The Hidden Costs of Sewing Acrylic — Thread Fade, Needle Holes, and Rework
Thread fade is the first failure mode. Acrylic fabric is engineered for UV resistance — it holds color and structural integrity under years of direct sun exposure. Thread is not. The polyester or nylon thread used to sew acrylic canvas degrades faster than the fabric itself. The result is a visually striking mismatch: faded thread running through intact fabric. For awning shops with warranty obligations, thread fade is a callback issue, not just a cosmetic one.
Needle hole leaks are the second failure mode. Every stitch creates a perforation in the fabric. When the thread is new and undegraded, it fills the hole and maintains reasonable water resistance. As the thread weakens from UV exposure, the holes open. Water infiltrates the seam line — exactly the failure mode an outdoor or marine product is designed to prevent.
Rework costs compound both problems. Re-sewing an acrylic seam requires removing the old thread, resetting the sewing machine, and running the seam again — with a real risk that the needle holes from the first pass compromise the repair. Running the same seam through a bonding machine after initial validation takes a fraction of the time. At production scale, the labor differential adds up to a meaningful cost per linear foot.
Bonding Strength: What Bonded Acrylic Achieves vs. Sewing
The industry benchmark for awning and marine seams is 60–80% of base fabric tensile strength. A seam below that range is a warranty risk; a seam at or above it holds for the product's expected service life. Properly bonded acrylic seams with correctly specified heat-activated tape consistently reach this benchmark — and maintain it throughout the product's life because the bond is not subject to UV degradation the way thread is.
Sewn seams may initially achieve similar strength numbers. The divergence happens over time. As thread degrades, seam strength drops. A bonded seam does not have that degradation path. For manufacturers who back their products with multi-year warranties, the bonded seam is the lower-risk specification.
Where Acrylic Fabric Bonding Is Used — Industries and Applications
The industries that specify acrylic canvas share a common operating condition: extended exposure to UV, moisture, and mechanical stress. Those conditions are exactly what makes sewing's failure modes most acute — and bonded seams most valuable. Below are the primary verticals Miller Weldmaster serves with acrylic bonding solutions.
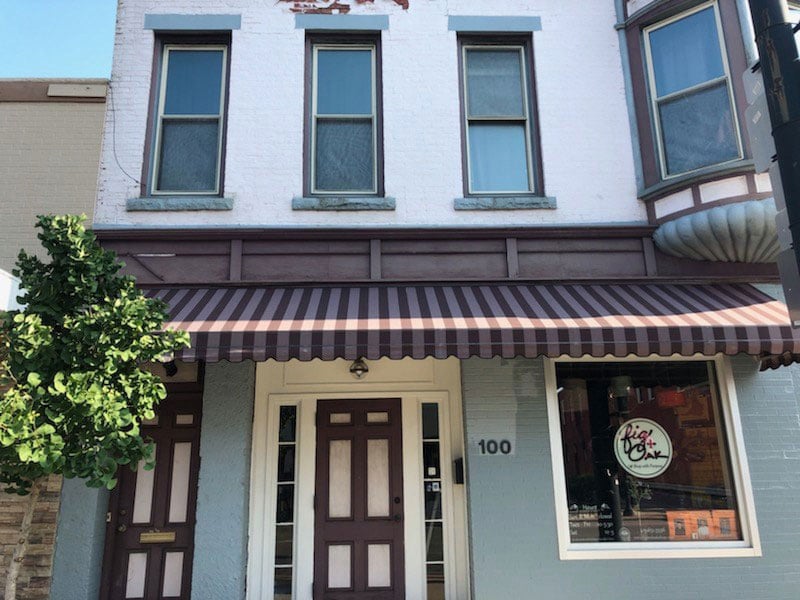
Awnings and Shade Structures
Awning fabrication is the largest single application for acrylic fabric bonding. A commercial awning is under continuous UV and rain load — often for five to ten years before replacement. Thread fade and needle hole leaks appear within the first two to three years under those conditions, triggering customer callbacks and warranty claims before the fabric itself has failed.
Bonded seams directly address both failure modes. The awning performs to specification for the full service life, the fabricator handles fewer callbacks, and warranty confidence translates directly into a competitive differentiator when bidding commercial projects. Shops making the switch to bonding typically report measurable reductions in seam rework within the first production quarter.
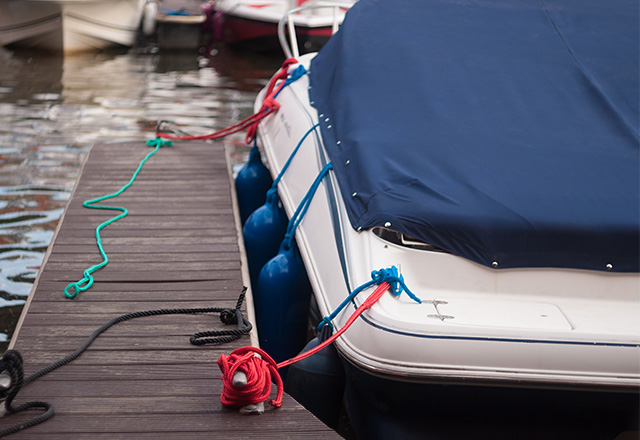
Marine Canvas and Boat Covers
Marine applications add saltwater and constant flexing to the UV and moisture exposure that awning applications already face. Those conditions accelerate thread degradation faster than any other environment — a sewn marine canvas product can develop seam leaks within a single boating season in high-UV, salt-spray conditions.
Bonded seams maintain watertight integrity across the flex cycles and chemical exposure that marine environments impose. Bimini tops, boat covers, and dodgers are the most common marine products where fabricators make the switch from sewing to bonding — and where the quality difference is most visible to the end customer.
Outdoor Leisure and Furniture
Patio furniture covers, umbrella canopies, and outdoor cushion enclosures face the same UV and moisture exposure as awnings, but add a consumer-facing aesthetic requirement. The seam is visible. Sewn seams on premium outdoor furniture products show thread fade and uneven stitch lines that communicate quality issues to the buyer, regardless of whether the seam has actually failed.
Bonded seams are visually clean — no visible stitch line, no thread discoloration. For manufacturers positioning their products at the premium end of the outdoor leisure market, the aesthetic advantage of bonded seams is as commercially significant as the structural advantage.
Specialty Industrial Applications
Beyond traditional outdoor and marine applications, acrylic fabric bonding serves filtration bags, protective covers, and custom industrial enclosures where chemical resistance and seam integrity under mechanical stress are non-negotiable requirements. In these applications, a sewn seam is often disqualified from the specification outright — the perforation risk is incompatible with the containment requirement. Bonded acrylic seams provide the fully sealed surface these applications demand.
Choosing the Right Machine for Acrylic Fabric Bonding — A Buyer's Decision Guide
The right machine for your operation depends on three variables: how much you produce per shift, what seam geometries your products require, and how heavy the acrylic fabric you run is. The framework below maps those variables to the machine categories Miller Weldmaster offers. Think of it as a starting point for the conversation with an applications specialist — not a final specification.
Low-Volume and Small Shop Operations
For shops bonding shorter runs, varied seam geometries, or a wide mix of acrylic products, impulse welding is typically the right starting point. The lower capital cost matches the production profile, and the flexibility to handle different seam lengths without major setup changes suits shops where no two jobs are identical.
Output profile: impulse machines handle seam lengths from a few inches to several feet, with cycle times that match manual-feed production paces. The key process variable is dwell time — the duration of the heat pulse. Getting that right for your specific tape and fabric combination is a one-time calibration that then produces consistent seams across the run.
Mid-Volume Awning and Marine Fabricators
Awning shops and marine canvas fabricators producing at mid-volume — regular production schedules, consistent fabric weights, and long continuous seam requirements — are the natural fit for hot air and hot wedge welding machines. Continuous seam production at consistent speeds is where these machines outperform impulse alternatives on a cost-per-linear-foot basis.
The T300 Extreme and 112 Extreme are Miller Weldmaster's purpose-built solutions for this production profile. Both are calibrated for acrylic bonding — the temperature range, pressure systems, and feed mechanisms are designed for the lower heat requirements and precise speed control that acrylic fabric demands.
High-Volume and Automated Production Lines
Manufacturers producing at scale — where the cost of machine downtime and seam rework is measured in production hours, not individual jobs — need machines with higher throughput and automation capability. RF welding and automated bonding systems address that requirement.
The Triad Extreme and Miller Weldmaster's custom automation options serve this segment. The focus at this production level is not just machine capability but system integration: how the bonding station fits into the broader production line, what upstream and downstream handling looks like, and how quality control is built into the process rather than applied after it.
Common Acrylic Bonding Failures — And How to Prevent Them
Acrylic bonding produces consistently strong seams when process parameters are set correctly. When it does not, the failure almost always traces back to one of three root causes: too much heat, insufficient pressure, or inconsistent settings across a production run. Each failure mode is preventable.
Additionally, insufficient curing time for acrylic adhesives can lead to weak bonds, as bond strength increases significantly over the first 24 hours after application and adhesives reach full strength only after proper cure. It is also crucial to consider cure times, as they can vary depending on the adhesive type and application conditions. When selecting a liquid adhesive or tape for acrylic fabric bonding, ensure it offers flexibility, UV resistance, and waterproof traits to maintain a durable and reliable bond.
Failure Mode 1 — Surface Glazing or Scorching
Surface glazing occurs when the temperature setting is too high for the specific acrylic fabric being bonded. Acrylic coatings — particularly the solution-dyed finishes used on premium awning and marine canvas — are sensitive to excess heat. Glazing affects both seam appearance and bond strength, because the adhesive on the tape may over-activate and lose structural integrity before the seam is set.
Prevention: Run a test seam at the lower end of your temperature range before committing to a production run on any new fabric lot. If glazing appears, reduce temperature before increasing speed. Slower speed at a lower temperature is consistently more reliable than faster speed at a higher one for acrylic materials.
Failure Mode 2 — Peel Failure at the Seam Edge Due to Surface Energy
Edge peel is the result of insufficient pressure during bonding, or adhesive tape that was not fully seated within the seam allowance before heat was applied. The center of the seam may bond correctly while the edges lift — a failure that becomes visible immediately on peel testing or, worse, in the field after installation.
Prevention: Verify tape placement before feeding material through the machine. Confirm pressure roller settings are within the recommended range for the fabric weight. After the first seam of any production run, conduct a 10-minute peel test — pull the seam apart by hand at the edge — before continuing. If the edge peels cleanly, adjust before proceeding.
Failure Mode 3 — Bonding Inconsistency Across a Production Run
Run-to-run inconsistency is the hardest failure mode to diagnose because individual seams may look acceptable while aggregate seam strength varies. The two most common causes are machine settings that drift over a long production run — particularly temperature, which can creep as the machine reaches thermal equilibrium — and fabric lot variation, where different coating weights or acrylic blends require different parameter settings.
Prevention: Calibrate machine settings at the start of each shift, not just at initial setup. When switching to a new material lot, treat it as a new material — run a test seam and validate before full production. Sample seam strength testing throughout a run (not just at the beginning) catches drift before it becomes a quality issue. Miller Weldmaster's service and training programs cover production calibration protocols for each machine model.
If you do not see your fabric listed to the left, please contact us and tell us about your fabric welding needs.